orchestrator安装部署
一、orchestrator简述
1、什么是orchestrator
Orchestrator是一款开源,对MySQL复制提供高可用、拓扑的可视化管理工具,采用go语言编写,它能够主动发现当前拓扑结构和主从复制状态,支持MySQL主从复制拓扑关系的调整、支持MySQL主库故障自动切换(failover)、手动主从切换(switchover)等功能。
Orchestrator后台依赖于MySQL或者SQLite存储元数据,能够提供Web界面展示MySQL集群的拓扑关系及实例状态,通过Web界面可更改MySQL实例的部分配置信息,同时也提供命令行和api接口,以便更加灵活的自动化运维管理。Orchestrator 对MySQL主库的故障切换分为自动切换和手动切换。手动切换又分为recover、force-master-failover、force-master-takeover以及graceful-master-takeover。
相比于MHA,Orchestrator更加偏重于复制拓扑关系的管理,能够实现MySQL任一复制拓扑关系的调整,并在此基础上,实现MySQL高可用。另外,Orchestrator自身也可以部署多个节点,通过raft分布式一致性协议,保证自身的高可用。
2、orchestrator的特点和作用
1.检测和审查复制集群,可以主动发现当前的拓扑结构和主从复制状态,读取基本的MySQL信息如复制状态和配置。 2.安全拓扑重构:转移服务于另外一台计算机的系统拓扑,orchestrator了解复制规则,可以解析binlog文件中的position、GTID、Pseudo GTID、binlog服务器 ,整洁的拓扑可视化 ,复制问题可视化 ,通过简单的拖拽修改拓扑。 3.故障修复,根据拓扑信息,可以识别各种故障,根据配置可以执行自动恢复。
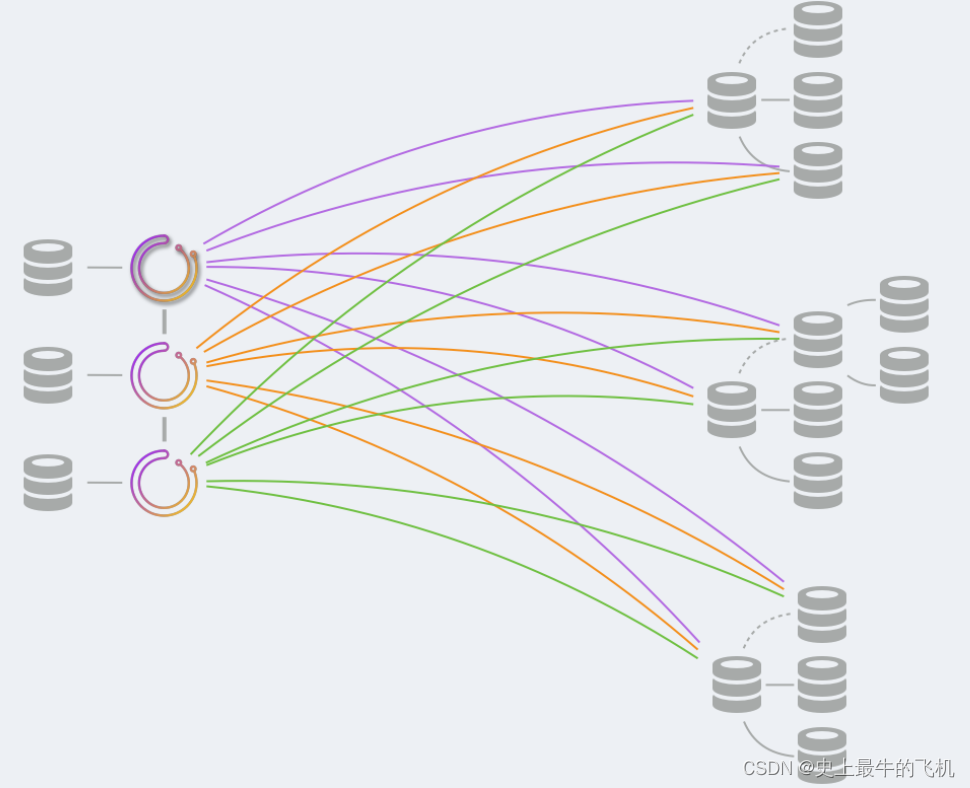
3、原理图
二、Orchestrator搭建
1.环境准备
| 主机 | hostname | 备注 |
|---|---|---|
| 192.168.10.10 | swarm01 | 主mysql(5.7.40) |
| 192.168.10.20 | swarm02 | 从mysql(5.7.40) |
| 192.168.10.30 | swarm03 | 从mysql(5.7.40) |
| 192.168.10.40 | swarm04 | 安装Orchestrator环境 |
2.在每台机器上配置hosts解析
192.168.10.10 swarm01
192.168.10.20 swarm02
192.168.10.30 swarm03
192.168.10.40 swarm04
3.每台主机做免密登录(每台机器都要做互相免密)
ssh-keygen -t rsa ##enter键执行3次
ssh-copy-id -i ~/.ssh/id_rsa.pub swarm04
ssh-copy-id -i ~/.ssh/id_rsa.pub swarm01  ##含义是对192.168.10.10登录做免密
ssh-copy-id -i ~/.ssh/id_rsa.pub swarm02  ##含义是对192.168.10.20登录做免密
ssh-copy-id -i ~/.ssh/id_rsa.pub mysql03 ##含义是对192.168.10.30登录做免密
4、关闭防火墙,selinux
systemctl stop firewalld
systemctl disable firewalld
#永久关闭selinux
sed -i '/^SELINUX=/ s/enforcing/disabled/' /etc/selinux/config
三、搭建主从环境
1.安装mysql
使用脚本安装mysql(4台服务器都需要安装)
#!/bin/bash
read -p "请确保/data/mysql/ 该目录下没有文件,该服务器没有正在运行的mysql服务 (yes|no):" result
case $result in
yes)
echo "脚本继续运行"
;;
no)
echo "退出脚本"
exit
;;
*)
echo "请输入yes或no"
;;
esac
# 解决软件的依赖关系
yum install cmake ncurses-devel gcc gcc-c++ lsof bzip2 openssl-devel ncurses-compat-libs -y
# 解压mysql二进制安装包
tar xf mysql-5.7.40-el7-x86_64.tar.gz
# 移动mysql解压后的文件到/usr/local下改名叫mysql
mv mysql-5.7.40-el7-x86_64 /usr/local/mysql
# 新建组和用户mysql
groupadd mysql
# mysql这个用户的shell 是/bin/false 属于mysql组
useradd -r -g mysql -s /bin/false mysql
# 关闭firewalld防火墙服务,并且设置开机不要启动
systemctl stop firewalld
systemctl disable firewalld
# 临时关闭selinux
setenforce 0
# 永久关闭selinux
sed -i '/^SELINUX=/ s/enforcing/disabled/' /etc/selinux/config
# 新建存放数据的目录
mkdir -p /data/mysql
# 修改/data/mysql目录的权限归mysql组所有,这样mysql用户可以对这个文件夹进行读写了
chown mysql:mysql /data/mysql
# 只是允许mysql这个用户和mysql组可以访问,其他人不能访问
chmod 750 /data/mysql
# 进入/usr/local/mysql/bin目录
cd /usr/local/mysql/bin
# 初始化mysql
./mysqld --initialize --user=mysql --basedir=/usr/local/mysql/ --datadir=/data/mysql &>passwd.txt
# 让mysql支持ssl方式登录的设置
./mysql_ssl_rsa_setup --datadir=/data/mysql/
# 获得临时密码
tem_passwd=$(cat passwd.txt | grep "temporary" | awk '{print $NF}')
# $NF表示最后一个字段
# abc=$(命令) 优先执行命令,然后将结果赋值给abc
# 修改PATH变量,加入mysql bin目录的路径
# 临时修改PATH变量的值
export PATH=/usr/local/mysql/bin/:$PATH
# 重新启动linux系统后也生效,永久修改
echo 'PATH=/usr/local/mysql/bin:$PATH' >>/root/.bashrc
# 复制support-files里的mysql.server文件到/etc/init.d目录下叫mysqld
cp ../support-files/mysql.server /etc/init.d/mysqld
# 修改/etc/init.d
sed -i '70c datadir=/data/mysql' /etc/init.d/mysqld
# 生成/etc/my.cnf配置文件
cat >/etc/my.cnf <<EOF
[mysqld_safe]
[client]
socket=/data/mysql/mysql.sock
[mysqld]
socket=/data/mysql/mysql.sock
port=3306
open_files_limit=8192
innodb_buffer_pool_size=512M
character-set-server=utf8
[mysql]
auto-rehash
prompt=\\u@\\d \\R:\\m mysql>
EOF
# 修改内核的openfile的数量
ulimit -n 1000000
# 设置开机启动的时候配置也生效
echo "ulimit -n 1000000" >>/etc/rc.local
chmod +x /etc/rc.d/rc.local
# 启动mysqld进程
service mysqld start
# 将mysqld添加到linux系统里服务管理名单里
/sbin/chkconfig --add mysqld
# 设置mysql服务开机启动
/sbin/chkconfig mysqld on
# 初次修改密码需要使用 --connet-expired-password 选项
# -e 后面接的表示是在mysql里需要执行命令 execute 执行
# set password='Sanchuang123#'; 修改root用户的密码为Sanchaung123#
mysql -uroot -p$tem_passwd --connect-expired-password -e "set password='123';"
# 检验上一步修改密码是否成功,如果有输出能看到mysql里的数据库,说明成功。
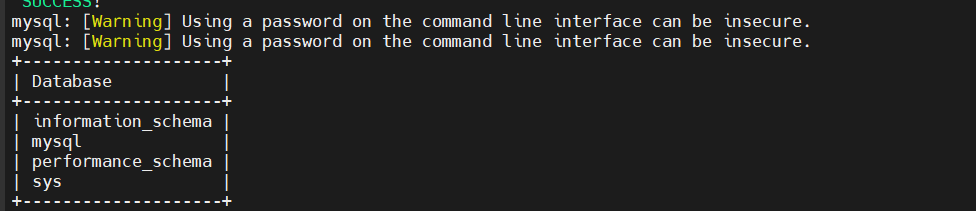
mysql -uroot -p'123' -e "show databases;"
#############出现以下结果即为安装成功##################
2.master、slave-1、slave-2上配置my.cnf
修改master的my.cnf文件
需要安装半同步插件(有些版本自带的有):
master安装插件(rpl_semi_sync_master plugin):
mysql> install plugin rpl_semi_sync_master soname 'semisync_master.so';
Query OK, 0 rows affected (0.08 sec)
#重新设置
mysql> set global rpl_semi_sync_master_enabled = 0;
Query OK, 0 rows affected (0.00 sec)
salve安装插件(rpl_semi_sync_slave plugin:):
mysql> install plugin rpl_semi_sync_slave soname 'semisync_slave.so';
Query OK, 0 rows affected (0.02 sec)
#重新设置
mysql> set global rpl_semi_sync_slave_enabled = 0;
Query OK, 0 rows affected (0.00 sec)
#在主库实例和从库实例上,都安装两个半同步复制插件。
因为如果发生主从切换,从库会成为主库。
查看半同步复制相关的plugins:
mysql> SELECT PLUGIN_NAME FROM INFORMATION_SCHEMA.PLUGINS WHERE PLUGIN_NAME LIKE 'rpl_semi_sync_%';
+----------------------+
| PLUGIN_NAME |
+----------------------+
| rpl_semi_sync_master |
| rpl_semi_sync_slave |
+----------------------+
2 rows in set (0.00 sec)
mysql>
[root@master ~]# cat /etc/my.cnf
[mysqld_safe]
[client]
socket=/data/mysql/mysql.sock
[mysqld]
socket=/data/mysql/mysql.sock
port=3306
open_files_limit=8192
innodb_buffer_pool_size=512M
character-set-server=utf8
log_bin=1
server_id=1
# 半同步,有些版本没有该插件,需要先安装插件,没有的先注释,安装完插件打开注释,重启服务
rpl_semi_sync_master_enabled=1
rpl_semi_sync_master_timeout=3000 # 3 second
expire_logs_days=7
# 开启GTID
gtid-mode=on
enforce-gtid-consistency=on
relay-log_purge=0
log_slave_updates=1
[mysql]
auto-rehash
prompt=\u@\d \R:\m mysql>
修改slave1-1的my.cnf文件
[root@slave-1 ~]# cat /etc/my.cnf
[mysqld_safe]
[client]
socket=/data/mysql/mysql.sock
[mysqld]
socket=/data/mysql/mysql.sock
port=3306
open_files_limit=8192
innodb_buffer_pool_size=512M
character-set-server=utf8
# binlog
log_bin=1
server_id=2
expire-logs-days=7
# 半同步,有些版本没有该插件,需要先安装插件,没有的先注释,安装完插件打开注释,重启服务
rpl_semi_sync_slave_enabled=1
# 开启GTID
gtid_mode=on
enforce-gtid-consistency=on
log_slave_updates=on
relay_log_purge=0
[mysql]
auto-rehash
prompt=\u@\d \R:\m mysql>
修改slave-2的my.cnf文件
[root@slave-2 ~]# cat /etc/my.cnf
[mysqld_safe]
[client]
socket=/data/mysql/mysql.sock
[mysqld]
socket=/data/mysql/mysql.sock
port=3306
open_files_limit=8192
innodb_buffer_pool_size=512M
character-set-server=utf8
# log
log_bin=1
server_id=3
expire-logs-days=7
# 开启GTID
gtid_mode=on
enforce-gtid-consistency=on
# 半同步,有些版本没有该插件,需要先安装插件,没有的先注释,安装完插件打开注释,重启服务
rpl_semi_sync_slave_enabled=1
relay_log_purge=0
log_slave_updates=1
[mysql]
auto-rehash
prompt=\u@\d \R:\m mysql>
#配置完重启服务
service restart mysqld
3.在master、slave-1、slave-2上分别做两个软链接
[root@swarm01 opt]# ln -s /usr/local/mysql/bin/mysql /usr/sbin
[root@swarm01 opt]# ln -s /usr/local/mysql/bin/mysqlbinlog /usr/sbin
[root@swarm01 opt]# ll /usr/sbin/mysql
lrwxrwxrwx 1 root root 26 2月 29 09:59 /usr/sbin/mysql -> /usr/local/mysql/bin/mysql
[root@swarm01 opt]# ll /usr/sbin/mysqlbinlog
lrwxrwxrwx 1 root root 32 2月 29 10:00 /usr/sbin/mysqlbinlog -> /usr/local/mysql/bin/mysqlbinlog
4.重启3台mysql服务,查看是否重启成功
# slave-1、slave-2根master做同样操作
[root@swarm01 opt]# systemctl restart mysqld
[root@swarm01 opt]# netstat -anplut |grep mysqld
tcp6 0 0 :::3306 :::* LISTEN 9680/mysqld
4.通过GTID配置主从复制
在所有的slave机器上导入基础数据,使得基础数据一致(这样操作容易出现从库报创建数据库报错,该步可以不操作)
#master导出备份文件
[root@swarm01 opt]# mysqldump --all-databases --set-gtid-purged=OFF -uroot -p123 >all_db.sql
mysqldump: [Warning] Using a password on the command line interface can be insecure.
# 正常警告,来自于密码暴露不安全
# master将备份文件复制到slave-1、2中的/data/mysql文件夹下去
[root@swarm01 opt]# scp /opt/all_db.sql swarm02:/data/mysql/
all_db.sql 100% 1062KB 54.3MB/s 00:00
[root@swarm01 opt]# scp /opt/all_db.sql swarm03:/data/mysql/
all_db.sql
# slave上传备份文件,使数据与master一致
[root@swarm02 opt]# mysql -uroot -p123 </data/mysql/all_db.sql
mysql: [Warning] Using a password on the command line interface can be insecure.
[root@swarm03 opt]# mysql -uroot -p123 </data/mysql/all_db.sql
mysql: [Warning] Using a password on the command line interface can be insecure.
在master上创建授权用户
root@(none) 01:23  mysql>grant replication slave on *.* to 'xiaobai'@'192.168.10.%' identified by '123';
Query OK, 0 rows affected, 1 warning (0.02 sec)
# relication slave 授予slave复制的权限
5.开启git功能,启动主从复制服务(在slave服务器上都要操作)
# 首先停止slave服务器上MySQL服务的slave服务
stop slave;
# 在所有slave中执行此命令
CHANGE MASTER TO MASTER_HOST='192.168.10.10' ,
MASTER_USER='xiaobai',
MASTER_PASSWORD='123',
MASTER_PORT=3306,
master_auto_position=1;
#开启mysqlroot远程登录命令
mysql> GRANT ALL PRIVILEGES ON *.* TO 'root'@'%' IDENTIFIED BY '123' WITH GRANT OPTION;
# 重新启动slave服务器上MySQL服务的slave服务
start slave;
#查看主从服务复制是否成功
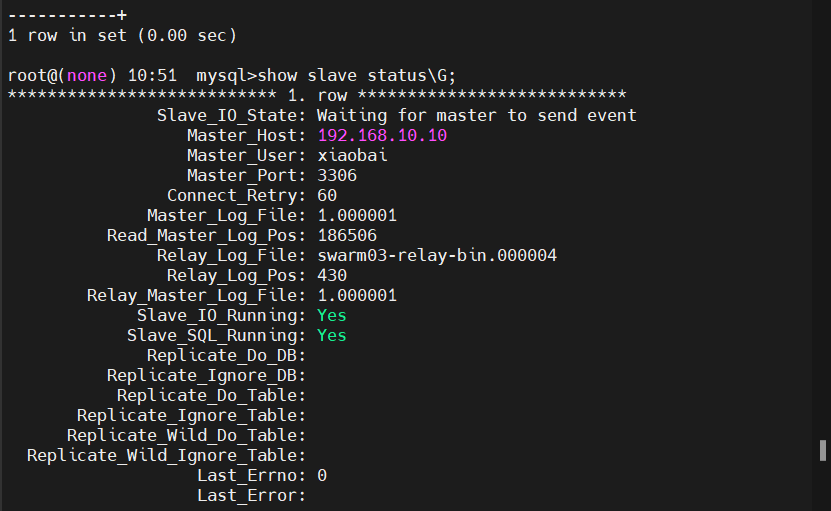
root@(none) 10:20 mysql>show slave status\G;
*************************** 1. row ***************************
Slave_IO_State: Waiting for master to send event
Master_Host: 192.168.10.10
Master_User: xiaobai
Master_Port: 3306
Connect_Retry: 60
Master_Log_File: 1.000001
Read_Master_Log_Pos: 185808
Relay_Log_File: swarm02-relay-bin.000003
Relay_Log_Pos: 186005
Relay_Master_Log_File: 1.000001
Slave_IO_Running: Yes
Slave_SQL_Running: Yes
Replicate_Do_DB:
Replicate_Ignore_DB:
Replicate_Do_Table:
Replicate_Ignore_Table:
Replicate_Wild_Do_Table:
Replicate_Wild_Ignore_Table:
Last_Errno: 0
Last_Error:
Skip_Counter: 0
Exec_Master_Log_Pos: 185808
Relay_Log_Space: 186391
Until_Condition: None
Until_Log_File:
Until_Log_Pos: 0
Master_SSL_Allowed: No
Master_SSL_CA_File:
Master_SSL_CA_Path:
Master_SSL_Cert:
Master_SSL_Cipher:
Master_SSL_Key:
Seconds_Behind_Master: 0
Master_SSL_Verify_Server_Cert: No
Last_IO_Errno: 0
Last_IO_Error:
Last_SQL_Errno: 0
Last_SQL_Error:
Replicate_Ignore_Server_Ids:
Master_Server_Id: 1
Master_UUID: a8c1930e-d69e-11ee-9fe3-000c29877eaa
Master_Info_File: /data/mysql/master.info
SQL_Delay: 0
SQL_Remaining_Delay: NULL
Slave_SQL_Running_State: Slave has read all relay log; waiting for more updates
Master_Retry_Count: 86400
Master_Bind:
Last_IO_Error_Timestamp:
Last_SQL_Error_Timestamp:
Master_SSL_Crl:
Master_SSL_Crlpath:
Retrieved_Gtid_Set: a8c1930e-d69e-11ee-9fe3-000c29877eaa:1-65
Executed_Gtid_Set: a8c1930e-d69e-11ee-9fe3-000c29877eaa:1-65
Auto_Position: 1
Replicate_Rewrite_DB:
Channel_Name:
Master_TLS_Version:
1 row in set (0.00 sec)
最后一步在master创建好mha用户,并通过主从复制同步给其他的slave服务器
root@(none) 22:07 mysql> grant all privileges on *.* to mha@'192.168.10.%' identified by 'mha_chaoge';
Query OK, 0 rows affected (0.00 sec)
四、安装Orchestrator
1.安装jq工具
# 安装epel源
[root@orche ~]# yum install epel-release -y
# 安装jq工具
[root@orche ~]# yum install jq -y
2.安装orchestrator
下载地址:https://github.com/openark/orchestrator/releases
#不做集群不用安装client
[root@swarm04 ~]# rpm -ivh orchestrator-3.2.6-1.x86_64.rpm
#安装完查看
[root@swarm04 ~]# rpm -qa | grep orchestrator
orchestrator-3.2.6-1.x86_64
orchestrator-client-3.2.6-1.x86_64
在在192.168.10.40的mysql上面创建Orchestrator账户,用于Orchestrator存储高可用架构的信息。还需要创建一个数据库
CREATE DATABASE IF NOT EXISTS orchestrator;
create user 'orchestrator'@'%' identified by '123456';
GRANT ALL PRIVILEGES ON `orchestrator`.* TO 'orchestrator'@'%';
在192.168.10.10、192.168.10.20、192.168.10.30的mysql创建Orchestrator账户,用于Orchestrator,抓取各个mysql的信息,主从结构、切换mysql主从等。
create user 'orchestrator'@'%' identified by '123456';
GRANT SUPER, PROCESS, REPLICATION SLAVE, RELOAD ON *.* TO 'orchestrator'@'%';
GRANT SELECT ON mysql.slave_master_info TO 'orchestrator'@'%';
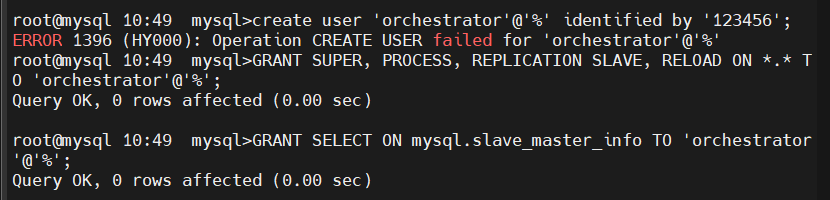
####出现此报错正常,因为从库已经同步用户,只需要赋予权限就好######
3.orchestrator 配置文件配置
在192.168.10.40【orchestrator】服务器操作
复制一份配置文件orchestrator.conf.json
[root@swarm04 ~]# cd /usr/local/orchestrator/
[root@swarm04 orchestrator]# ls
orchestrator                   orchestrator-sample-sqlite.conf.json  orc_vip.sh
orchestrator.conf.json         orch_vip.sh                           resources
orchestrator-sample.conf.json  orc.log
[root@swarm04 orchestrator]# cp orchestrator-sample.conf.json orchestrator.conf.json
orchestrator.conf.json文件是一个json文件,主要配置以下参数
{
"Debug": true,
"EnableSyslog": false,
"ListenAddress": ":3000",
"MySQLTopologyUser": "orchestrator",
        "MySQLTopologyPassword": "123456",
        "MySQLTopologyCredentialsConfigFile": "",
        "MySQLTopologySSLPrivateKeyFile": "",
        "MySQLTopologySSLCertFile": "",
        "MySQLTopologySSLCAFile": "",
        "MySQLTopologySSLSkipVerify": true,
        "MySQLTopologyUseMutualTLS": false,
        "MySQLOrchestratorHost": "192.168.10.40",
        "MySQLOrchestratorPort": 3306,
        "MySQLOrchestratorDatabase": "orchestrator",
        "MySQLOrchestratorUser": "orchestrator",
        "MySQLOrchestratorPassword": "123456",
"MySQLOrchestratorCredentialsConfigFile": "",
"MySQLOrchestratorSSLPrivateKeyFile": "",
"MySQLOrchestratorSSLCertFile": "",
"MySQLOrchestratorSSLCAFile": "",
"MySQLOrchestratorSSLSkipVerify": true,
"MySQLOrchestratorUseMutualTLS": false,
"MySQLConnectTimeoutSeconds": 1,
"DefaultInstancePort": 3306,
"DiscoverByShowSlaveHosts": true,
"InstancePollSeconds": 5,
"DiscoveryIgnoreReplicaHostnameFilters": [
"a_host_i_want_to_ignore[.]example[.]com",
".*[.]ignore_all_hosts_from_this_domain[.]example[.]com",
"a_host_with_extra_port_i_want_to_ignore[.]example[.]com:3307"
],
"UnseenInstanceForgetHours": 240,
"SnapshotTopologiesIntervalHours": 0,
"InstanceBulkOperationsWaitTimeoutSeconds": 10,
"HostnameResolveMethod": "default",
"MySQLHostnameResolveMethod": "@@hostname",
"SkipBinlogServerUnresolveCheck": true,
"ExpiryHostnameResolvesMinutes": 60,
"RejectHostnameResolvePattern": "",
"ReasonableReplicationLagSeconds": 10,
"ProblemIgnoreHostnameFilters": [],
"VerifyReplicationFilters": false,
"ReasonableMaintenanceReplicationLagSeconds": 20,
"CandidateInstanceExpireMinutes": 60,
"AuditLogFile": "",
"AuditToSyslog": false,
"RemoveTextFromHostnameDisplay": ".mydomain.com:3306",
"ReadOnly": false,
"AuthenticationMethod": "",
"HTTPAuthUser": "",
"HTTPAuthPassword": "",
"AuthUserHeader": "",
"PowerAuthUsers": [
"*"
],
"ClusterNameToAlias": {
"127.0.0.1": "test suite"
},
"ReplicationLagQuery": "",
"DetectClusterAliasQuery": "SELECT SUBSTRING_INDEX(@@hostname, '.', 1)",
"DetectClusterDomainQuery": "",
"DetectInstanceAliasQuery": "",
"DetectPromotionRuleQuery": "",
"DataCenterPattern": "[.]([^.]+)[.][^.]+[.]mydomain[.]com",
"PhysicalEnvironmentPattern": "[.]([^.]+[.][^.]+)[.]mydomain[.]com",
"PromotionIgnoreHostnameFilters": [],
"DetectSemiSyncEnforcedQuery": "",
"ServeAgentsHttp": false,
"AgentsServerPort": ":3001",
"AgentsUseSSL": false,
"AgentsUseMutualTLS": false,
"AgentSSLSkipVerify": false,
"AgentSSLPrivateKeyFile": "",
"AgentSSLCertFile": "",
"AgentSSLCAFile": "",
"AgentSSLValidOUs": [],
"UseSSL": false,
"UseMutualTLS": false,
"SSLSkipVerify": false,
"SSLPrivateKeyFile": "",
"SSLCertFile": "",
"SSLCAFile": "",
"SSLValidOUs": [],
"URLPrefix": "",
"StatusEndpoint": "/api/status",
"StatusSimpleHealth": true,
"StatusOUVerify": false,
"AgentPollMinutes": 60,
"UnseenAgentForgetHours": 6,
"StaleSeedFailMinutes": 60,
"SeedAcceptableBytesDiff": 8192,
"PseudoGTIDPattern": "",
"PseudoGTIDPatternIsFixedSubstring": false,
"PseudoGTIDMonotonicHint": "asc:",
"DetectPseudoGTIDQuery": "",
"BinlogEventsChunkSize": 10000,
"SkipBinlogEventsContaining": [],
"ReduceReplicationAnalysisCount": true,
"FailureDetectionPeriodBlockMinutes": 1,
"FailMasterPromotionOnLagMinutes": 0,
"RecoveryPeriodBlockSeconds": 30,
"RecoveryIgnoreHostnameFilters": [],
"RecoverMasterClusterFilters": [
"*"
],
"RecoverIntermediateMasterClusterFilters": [
"*"
],
"OnFailureDetectionProcesses": [
"echo 'Detected {failureType} on {failureCluster}. Affected replicas: {countSlaves}' >> /tmp/recovery.log"
],
"PreGracefulTakeoverProcesses": [
"echo 'Planned takeover about to take place on {failureCluster}. Master will switch to read_only' >> /tmp/recovery.log"
],
"PreFailoverProcesses": [
"echo 'Will recover from {failureType} on {failureCluster}' >> /tmp/recovery.log"
],
"PostFailoverProcesses": [
"echo '(for all types) Recovered from {failureType} on {failureCluster}. Failed: {failedHost}:{failedPort}; Successor: {successorHost}:{successorPort}{failureClusterAlias}' >> /tmp/recovery.log", "/home/orch/orch_hook.sh {failureType} {failureClusterAlias} {failedHost} {successorHost} >> /tmp/orch.log"
],
"PostUnsuccessfulFailoverProcesses": [],
"PostMasterFailoverProcesses": [
"echo 'Recovered from {failureType} on {failureCluster}. Failed: {failedHost}:{failedPort}; Promoted: {successorHost}:{successorPort}' >> /tmp/recovery.log"
],
"PostIntermediateMasterFailoverProcesses": [
"echo 'Recovered from {failureType} on {failureCluster}. Failed: {failedHost}:{failedPort}; Successor: {successorHost}:{successorPort}' >> /tmp/recovery.log"
],
"PostGracefulTakeoverProcesses": [
"echo 'Planned takeover complete' >> /tmp/recovery.log"
],
"CoMasterRecoveryMustPromoteOtherCoMaster": true,
"DetachLostSlavesAfterMasterFailover": true,
"ApplyMySQLPromotionAfterMasterFailover": true,
"PreventCrossDataCenterMasterFailover": false,
"PreventCrossRegionMasterFailover": false,
"MasterFailoverDetachReplicaMasterHost": false,
"MasterFailoverLostInstancesDowntimeMinutes": 0,
"PostponeReplicaRecoveryOnLagMinutes": 0,
"OSCIgnoreHostnameFilters": [],
"GraphiteAddr": "",
"GraphitePath": "",
"GraphiteConvertHostnameDotsToUnderscores": true,
"ConsulAddress": "",
"ConsulAclToken": "",
"ConsulKVStoreProvider": "consul"
}
配置修改:
MySQLTopologyUser 和 MySQLTopologyPassword
表示的是192.168.10.10、192.168.10.20、192.168.10.30上面的mysql账户
"MySQLTopologyUser": "orchestrator",
"MySQLTopologyPassword": "123456",
"MySQLTopologyCredentialsConfigFile": "",
"MySQLTopologySSLPrivateKeyFile": "",
"MySQLTopologySSLCertFile": "",
"MySQLTopologySSLCAFile": "",
"MySQLTopologySSLSkipVerify": true,
"MySQLTopologyUseMutualTLS": false,
"MySQLOrchestratorHost": "192.168.10.40",
"MySQLOrchestratorPort": 3306,
"MySQLOrchestratorDatabase": "orchestrator",
"MySQLOrchestratorUser": "orchestrator",
"MySQLOrchestratorPassword": "123456",
上面的参数对应的是192.168.10.40对应的存储Orchestrator信息的数据库,这里一定要理解清楚,很容易搞混淆。
RecoverMasterClusterFilters RecoverIntermediateMasterClusterFilters
两个参数建议都配置 * ,不然后面多次切换主从的时候,第二次不会成功
RecoveryPeriodBlockSeconds 3600 ##已经出故障后切换 3600s 后才能切换下一次 FailureDetectionPeriodBlockMinutes 1 在该时间内再次出现故障,不会被多次发现
如果在测试的环境把这两个值调小一点,不然多次切换主从会有问题
4.启动orchestrator
在/usr/local/orchestrator 目录下执行
nohup ./orchestrator --debug http > orc.log 2>&1 &
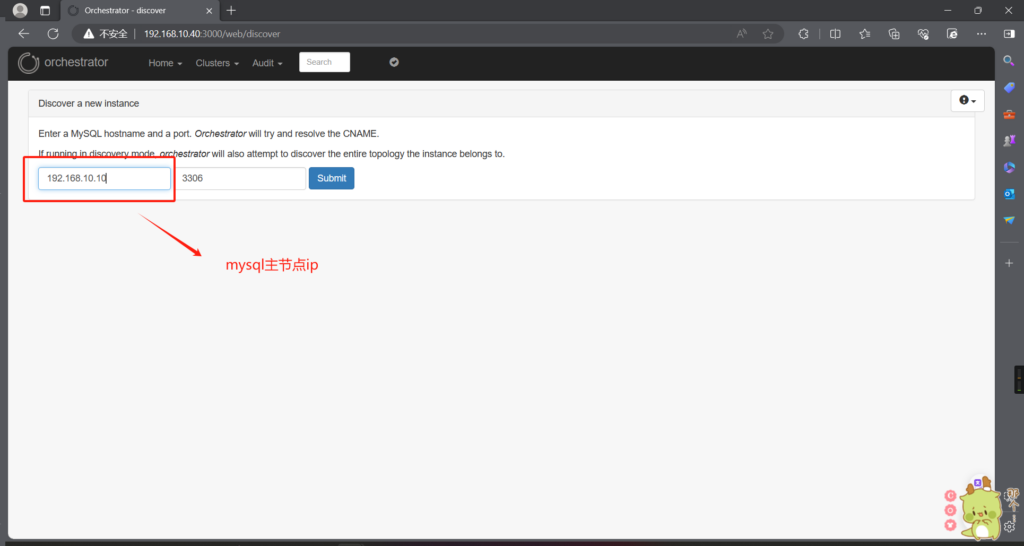
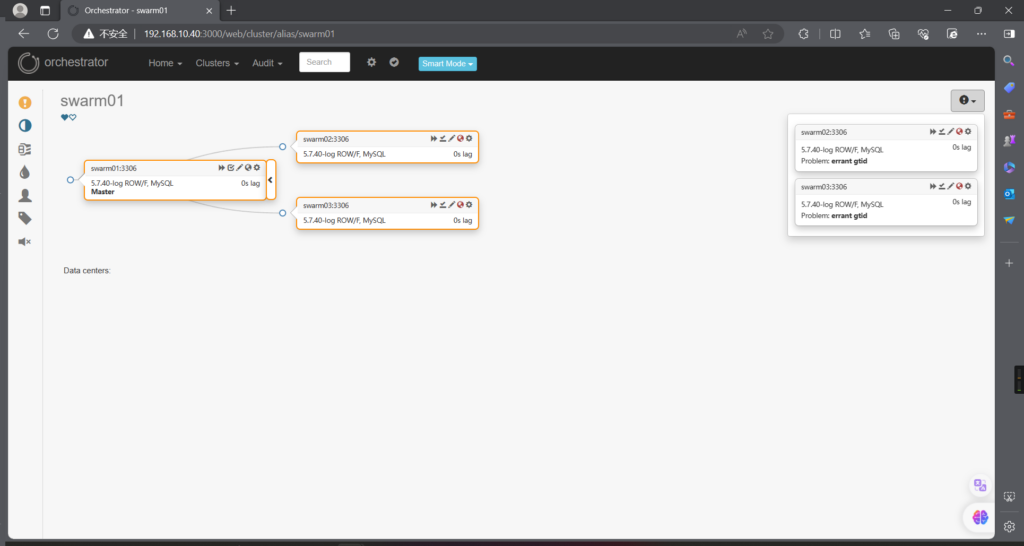
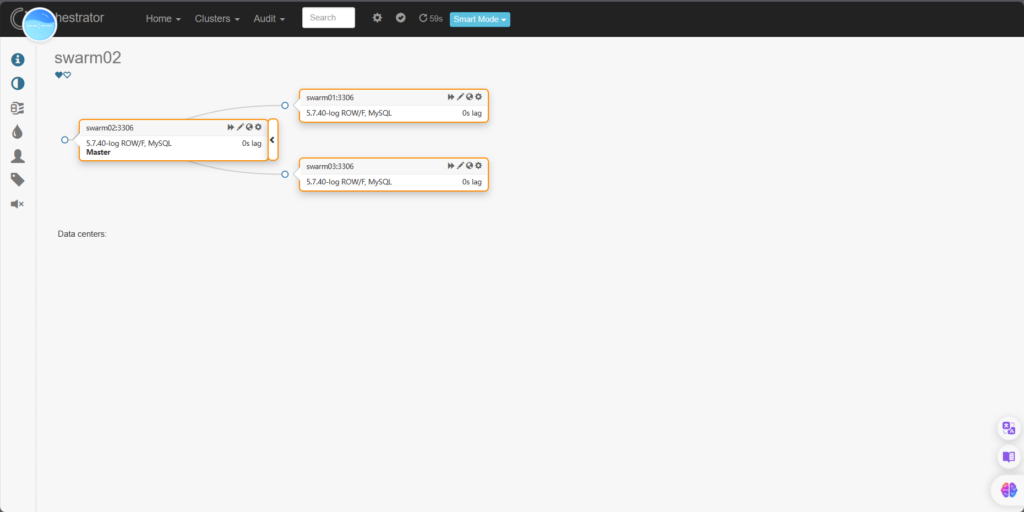
进入orchestrator web页面
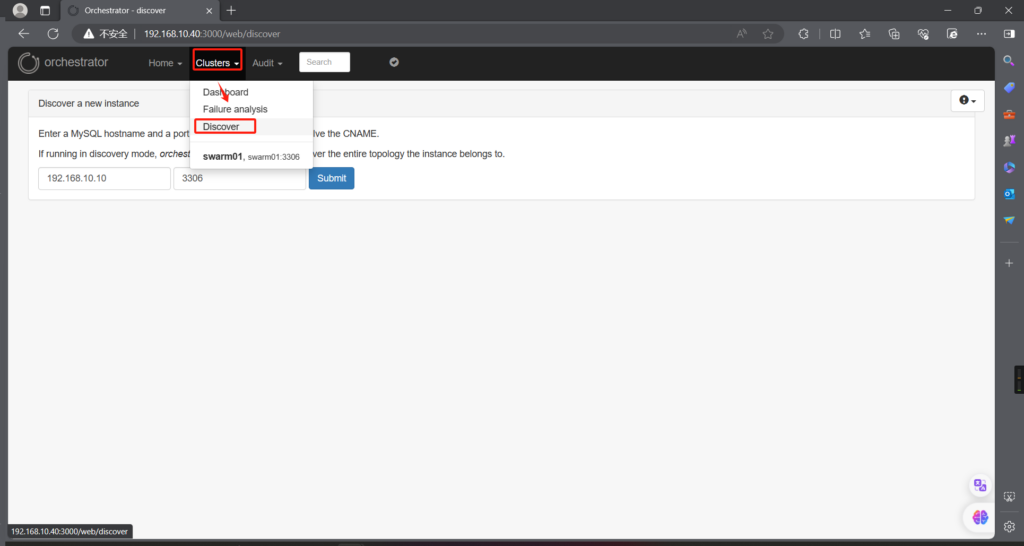
点击 Submit
然后点击dashboard
#到此部署完成
五、节点恢复
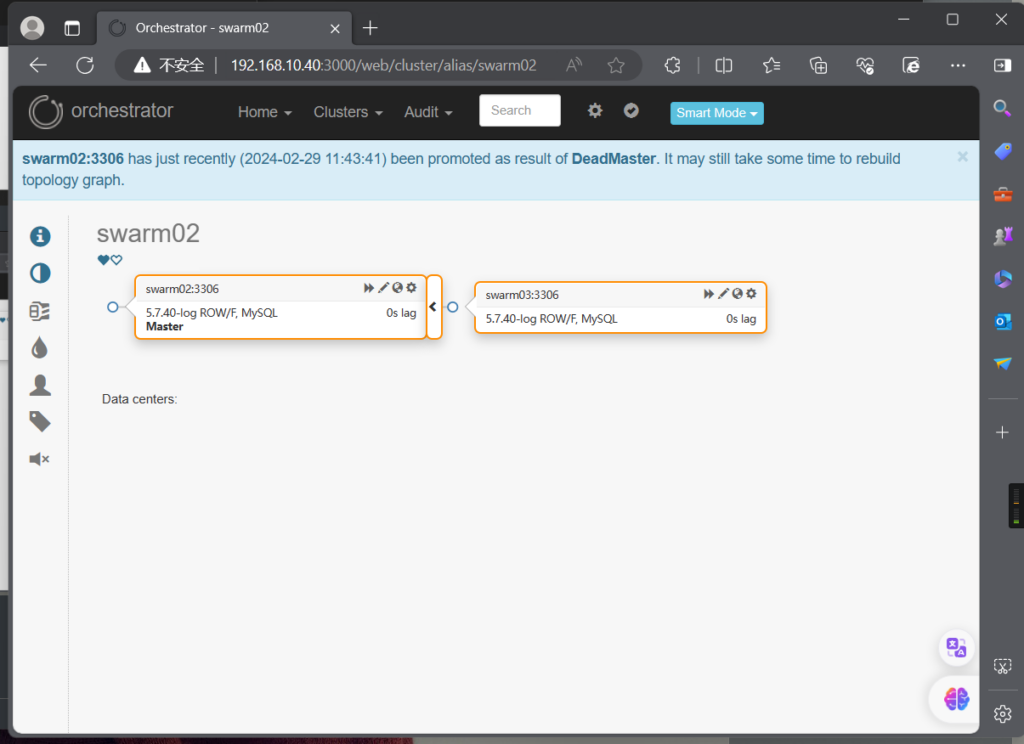
1.停掉master节点mysql
[root@swarm01 opt]# systemctl stop mysqld
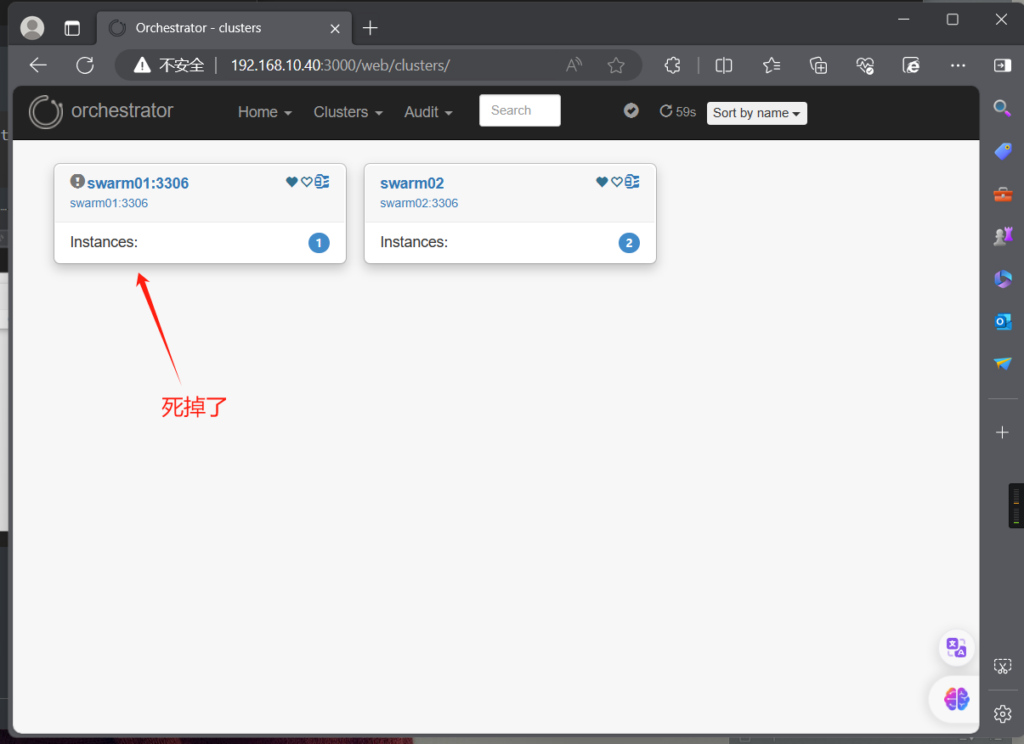
swarm02 变为主的了
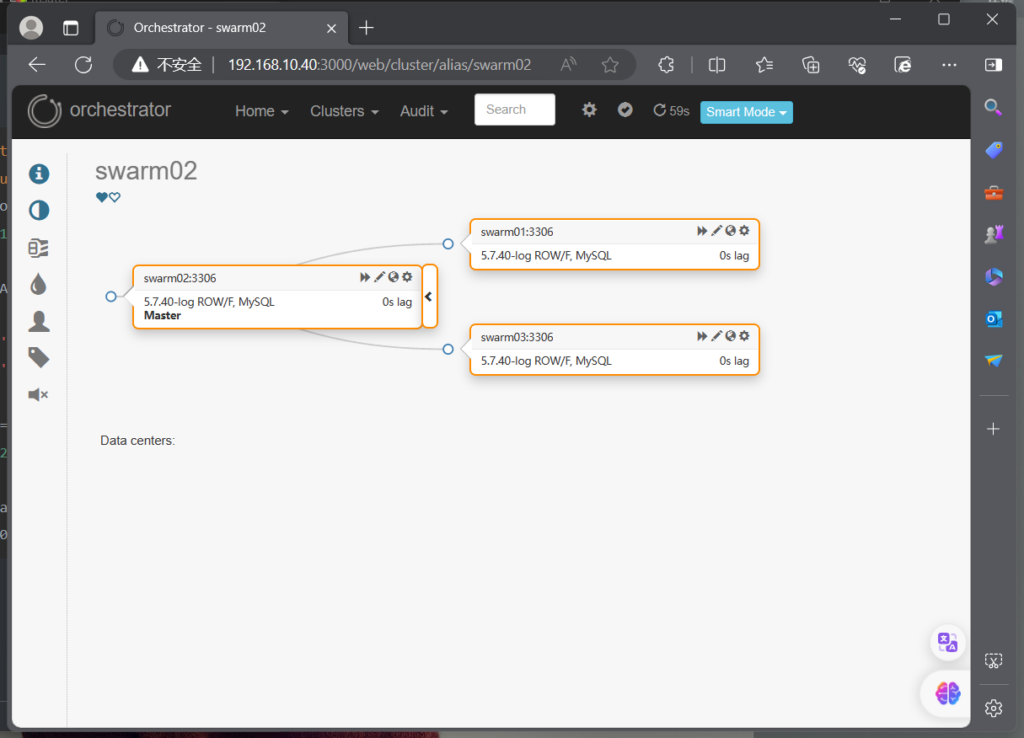
2.将原master加入集群
[root@swarm01 opt]# systemctl start mysqld
[root@swarm01 opt]# mysql -uroot -p123
###############################################
CHANGE MASTER TO MASTER_HOST='192.168.10.20' ,
MASTER_USER='xiaobai',
MASTER_PASSWORD='123',
MASTER_PORT=3306,
master_auto_position=1;
################################################
root@(none) 11:49 mysql>stop slave;
Query OK, 0 rows affected, 1 warning (0.00 sec)
root@(none) 11:49 mysql>CHANGE MASTER TO MASTER_HOST='192.168.10.20' ,
-> MASTER_USER='xiaobai',
-> MASTER_PASSWORD='123',
-> MASTER_PORT=3306,
-> master_auto_position=1;
Query OK, 0 rows affected, 2 warnings (0.00 sec)
root@(none) 11:49 mysql>start slave;
Query OK, 0 rows affected (0.00 sec)
六、主从切换
1.vip怎么漂移
Orchestrator中配置钩子,在orchestrator.conf.json配置文件中,添加

逻辑就是:在PostFailoverProcesses配置中添加一个shell脚本,orchestrator主从切换成功以后就会执行这个脚本。上面也可以配置不同的钩子,在orchestrator不同状态下执行对于的脚本。这里只讲vip相关的。
“/home/orch/orch_hook.sh {failureType} {failureClusterAlias} {failedHost} {successorHost} >> /tmp/orch.log”
有问题可以看上面的配置文件,里面直接复制 所以我们的shell脚本就在 /home/orch/orch_hook.sh 中
#!/bin/bash
isitdead=$1
cluster=$2
oldmaster=$3
newmaster=$4
mysqluser="orchestrator"
export MYSQL_PWD="123456"
logfile="/var/log/orch_hook.log"
# list of clusternames
#clusternames=(rep blea lajos)
# clustername=( interface IP user Inter_IP)
#rep=( ens32 "192.168.56.121" root "192.168.56.125")
if [[ $isitdead == "DeadMaster" ]]; then
array=( ens33 "192.168.10.200" root "192.168.10.40")
interface=${array[0]}
IP=${array[1]}
user=${array[2]}
if [ ! -z ${IP} ] ; then
echo $(date)
echo "Revocering from: $isitdead"
echo "New master is: $newmaster"
echo "/usr/local/orchestrator/orch_vip.sh -d 1 -n $newmaster -i ${interface} -I ${IP} -u ${user} -o $oldmaster" | tee $logfile
/usr/local/orchestrator/orch_vip.sh -d 1 -n $newmaster -i ${interface} -I ${IP} -u ${user} -o $oldmaster
#mysql -h$newmaster -u$mysqluser < /usr/local/bin/orch_event.sql
else
echo "Cluster does not exist!" | tee $logfile
fi
elif [[ $isitdead == "DeadIntermediateMasterWithSingleSlaveFailingToConnect" ]]; then
array=( ens33 "192.168.10.200" root "192.168.10.40")
interface=${array[0]}
IP=${array[1]}
user=${array[2]}
slavehost=`echo $5 | cut -d":" -f1`
echo $(date)
echo "Revocering from: $isitdead"
echo "New intermediate master is: $slavehost"
echo "/usr/local/orchestrator/orch_vip.sh -d 1 -n $slavehost -i ${interface} -I ${IP} -u ${user} -o $oldmaster" | tee $logfile
/usr/local/orchestrator/orch_vip.sh -d 1 -n $slavehost -i ${interface} -I ${IP} -u ${user} -o $oldmaster
elif [[ $isitdead == "DeadIntermediateMaster" ]]; then
array=( ens33 "192.168.10.200" root "192.168.10.40")
interface=${array[0]}
IP=${array[3]}
user=${array[2]}
slavehost=`echo $5 | sed -E "s/:[0-9]+//g" | sed -E "s/,/ /g"`
showslave=`mysql -h$newmaster -u$mysqluser -sN -e "SHOW SLAVE HOSTS;" | awk '{print $2}'`
newintermediatemaster=`echo $slavehost $showslave | tr ' ' '\n' | sort | uniq -d`
echo $(date)
echo "Revocering from: $isitdead"
echo "New intermediate master is: $newintermediatemaster"
echo "/usr/local/orchestrator/orch_vip.sh -d 1 -n $newintermediatemaster -i ${interface} -I ${IP} -u ${user} -o $oldmaster" | tee $logfile
/usr/local/orchestrator/orch_vip.sh -d 1 -n $newintermediatemaster -i ${interface} -I ${IP} -u ${user} -o $oldmaster
fi
上面的脚本需要修改的地方 array=( ens33 “192.168.10.200” root “192.168.10.40”)
ens33表示网卡,填自己的电脑上面的
192.168.10.200 表示vip地址
192.168.10.40 表示orchestrator安装的ip
root 表示免登录的linux账户
2.飘移脚本
/usr/local/orchestrator/orch_vip.sh 漂移脚本
#!/bin/bash
emailaddress="email@example.com"
sendmail=0
function usage {
cat << EOF
usage: $0 [-h] [-d master is dead] [-o old master ] [-s ssh options] [-n new master] [-i interface] [-I] [-u SSH user]
OPTIONS:
-h Show this message
-o string Old master hostname or IP address
-d int If master is dead should be 1 otherweise it is 0
-s string SSH options
-n string New master hostname or IP address
-i string Interface exmple eth0:1
-I string Virtual IP
-u string SSH user
EOF
}
while getopts ho:d:s:n:i:I:u: flag; do
case $flag in
o)
orig_master="$OPTARG";
;;
d)
isitdead="${OPTARG}";
;;
s)
ssh_options="${OPTARG}";
;;
n)
new_master="$OPTARG";
;;
i)
interface="$OPTARG";
;;
I)
vip="$OPTARG";
;;
u)
ssh_user="$OPTARG";
;;
h)
usage;
exit 0;
;;
*)
usage;
exit 1;
;;
esac
done
if [ $OPTIND -eq 1 ]; then
echo "No options were passed";
usage;
fi
shift $(( OPTIND - 1 ));
# discover commands from our path
ssh=$(which ssh)
arping=$(which arping)
ip2util=$(which ip)
# command for adding our vip
cmd_vip_add="sudo -n $ip2util address add ${vip} dev ${interface}"
# command for deleting our vip
cmd_vip_del="sudo -n $ip2util address del ${vip}/32 dev ${interface}"
# command for discovering if our vip is enabled
cmd_vip_chk="sudo -n $ip2util address show dev ${interface} to ${vip%/*}/32"
# command for sending gratuitous arp to announce ip move
cmd_arp_fix="sudo -n $arping -c 1 -I ${interface} ${vip%/*} "
# command for sending gratuitous arp to announce ip move on current server
cmd_local_arp_fix="sudo -n $arping -c 1 -I ${interface} ${vip%/*} "
vip_stop() {
rc=0
# ensure the vip is removed
$ssh ${ssh_options} -tt ${ssh_user}@${orig_master} \
"[ -n \"\$(${cmd_vip_chk})\" ] && ${cmd_vip_del} && sudo ${ip2util} route flush cache || [ -z \"\$(${cmd_vip_chk})\" ]"
rc=$?
return $rc
}
vip_start() {
rc=0
# ensure the vip is added
# this command should exit with failure if we are unable to add the vip
# if the vip already exists always exit 0 (whether or not we added it)
$ssh ${ssh_options} -tt ${ssh_user}@${new_master} \
"[ -z \"\$(${cmd_vip_chk})\" ] && ${cmd_vip_add} && ${cmd_arp_fix} || [ -n \"\$(${cmd_vip_chk})\" ]"
rc=$?
$cmd_local_arp_fix
return $rc
}
vip_status() {
$arping -c 1 -I ${interface} ${vip%/*}
if ping -c 1 -W 1 "$vip"; then
return 0
else
return 1
fi
}
if [[ $isitdead == 0 ]]; then
echo "Online failover"
if vip_stop; then
if vip_start; then
echo "$vip is moved to $new_master."
if [ $sendmail -eq 1 ]; then mail -s "$vip is moved to $new_master." "$emailaddress" < /dev/null &> /dev/null ; fi
else
echo "Can't add $vip on $new_master!"
if [ $sendmail -eq 1 ]; then mail -s "Can't add $vip on $new_master!" "$emailaddress" < /dev/null &> /dev/null ; fi
exit 1
fi
else
echo $rc
echo "Can't remove the $vip from orig_master!"
if [ $sendmail -eq 1 ]; then mail -s "Can't remove the $vip from orig_master!" "$emailaddress" < /dev/null &> /dev/null ; fi
exit 1
fi
elif [[ $isitdead == 1 ]]; then
echo "Master is dead, failover"
# make sure the vip is not available
if vip_status; then
if vip_stop; then
if [ $sendmail -eq 1 ]; then mail -s "$vip is removed from orig_master." "$emailaddress" < /dev/null &> /dev/null ; fi
else
if [ $sendmail -eq 1 ]; then mail -s "Couldn't remove $vip from orig_master." "$emailaddress" < /dev/null &> /dev/null ; fi
exit 1
fi
fi
if vip_start; then
echo "$vip is moved to $new_master."
if [ $sendmail -eq 1 ]; then mail -s "$vip is moved to $new_master." "$emailaddress" < /dev/null &> /dev/null ; fi
else
echo "Can't add $vip on $new_master!"
if [ $sendmail -eq 1 ]; then mail -s "Can't add $vip on $new_master!" "$emailaddress" < /dev/null &> /dev/null ; fi
exit 1
fi
else
echo "Wrong argument, the master is dead or live?"
fi
上面两个文件记得权限和可执行的问题。
3.在mysql主节点添加vip
[root@swarm04 orchestrator]# ip addr add dev ens33 192.168.10.200/32
删除网卡
ip addr del 192.168.10.200/32 dev ens33
4.测试vip飘移:
停掉主节点的mysql,看192.168.10.200 vip是否飘移;(效果为msyql 主节点vip飘移到其他节点,可在其他节点查看),也可通过orchestrator观察;
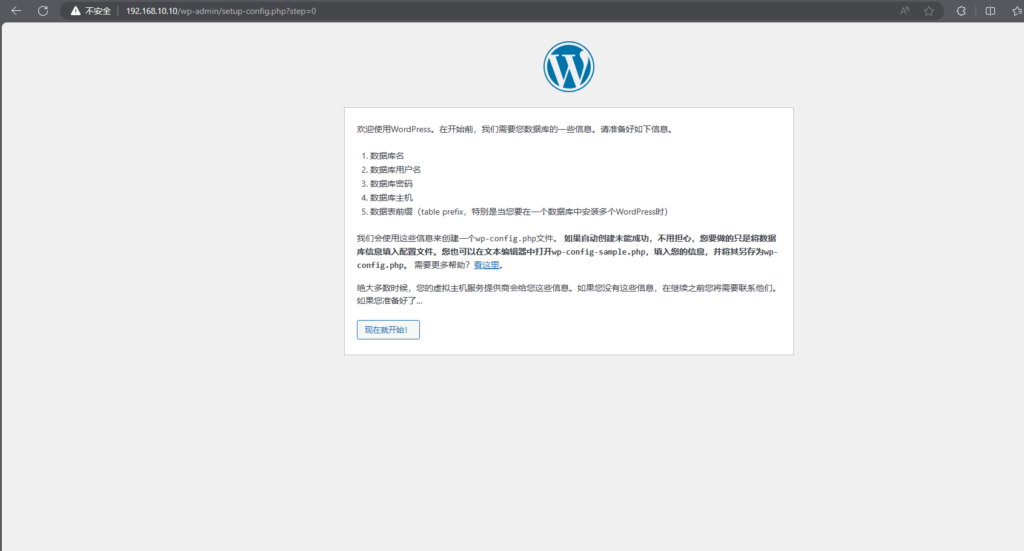
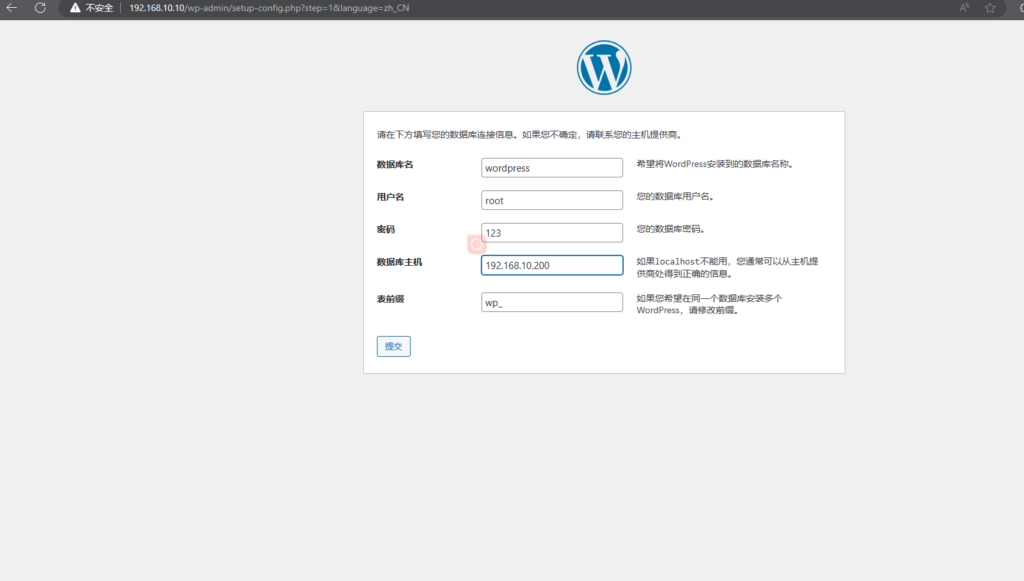
5.也可部署wordpress 私人博客测试
在主节点创建wordpress 库
root@(none) 16:46 mysql>create database wordpress;
Query OK, 1 row affected (0.00 sec)
####使root用户可远程登录
root@(none) 16:46 mysql>GRANT ALL PRIVILEGES ON *.* TO 'root'@'%' IDENTIFIED BY 'root' WITH GRANT OPTION;
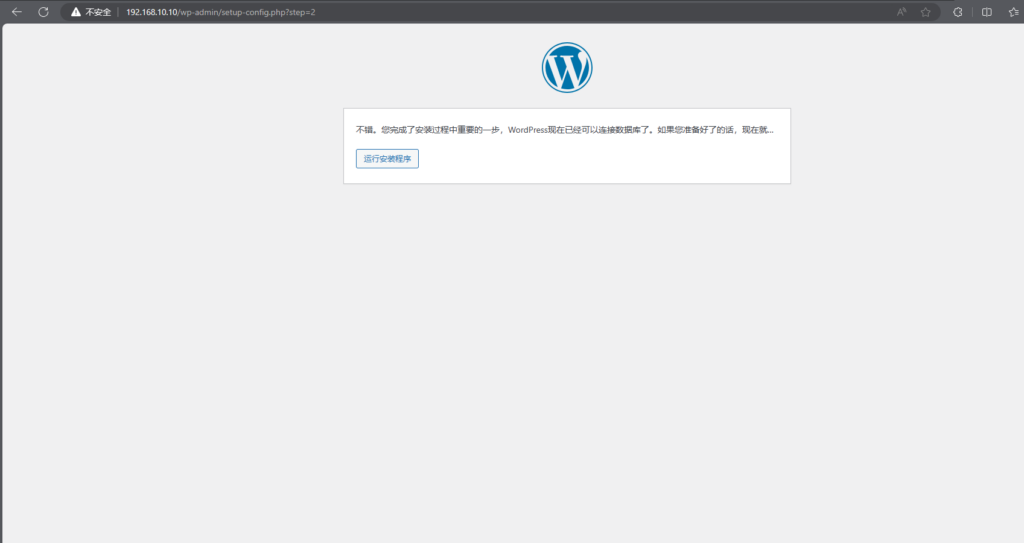
部署wordpress
[root@swarm01 opt]# docker run -d --name wordpress -p 80:80 wordpress

数据库地址填写vip地址
安装完

然后将master节点关闭,测试服务是否正常,从节点恢复是否正常(与之前从节点恢复一样);
从节点加入主节点(MASTER_HOST=’主节点IP’):
CHANGE MASTER TO MASTER_HOST='192.168.10.10' ,
MASTER_USER='xiaobai',
MASTER_PASSWORD='123',
MASTER_PORT=3306,
master_auto_position=1;
没有回应